How to Make a Concrete Dining Table
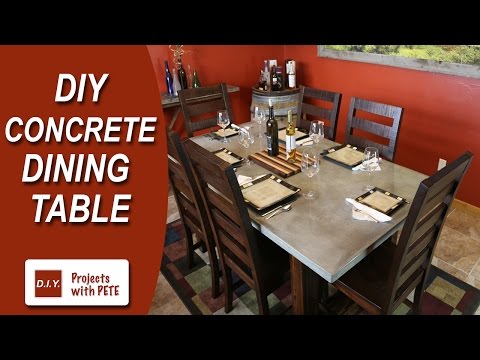
DIY Concrete Dining Table how to video tutorial. This is an excellent DIY concrete project for beginners and the more experienced alike! This clean, modern, minimalist design approach will look great in your dining room. This project doesn’t take that long to make and is attainable by anyone if you follow this step-by-step tutorial. Best of luck on yours! This particular 1 1/2″ concrete top weighs about 370 pounds total.
For more info, project photos, and downloadable plans check out:
http://www.diypete.com/ConcreteDiningTable
Download Plans: http://gumroad.com/l/ConcreteDiningTable
*Note that these are affiliate links, meaning that when you buy something that is recommended below, it helps support the Channel. Thanks in advance!
*Tools Needed
Miter Saw –http://amzn.to/1VUVo8s
Table Saw – http://amzn.to/1X7Eje5
OR
Circular Saw – http://amzn.to/1OxNa7k
Drill – http://amzn.to/1OxMfnt
Impact Driver – http://amzn.to/1Qx83jD
Orbital Sander – http://amzn.to/1VUVNYy
Concrete Trowel – http://amzn.to/1Lp87Kp
Respirator mask – http://amzn.to/1Lp80ym
*Supplies Needed
Quikrete Countertop Mix or Quikrete 5000 (less expensive option)
Cheng Concrete Sealer –http://amzn.to/1Qx83QO
100% Silicone – http://amzn.to/1Qx847e
4 – L Brackets/Joists – http://amzn.to/1Lp83KJ
Gorilla Wood Glue – http://amzn.to/1Lp7Zuk
Minwax Polyurethane – http://amzn.to/1Qx86fd
Approximate Total Cost: $195
The Concrete Dining Table can be made for under $195 dollars in materials cost. This is the cost for the concrete, wood, wood finish, concrete sealer, and other basic supplies. This estimate considers you’re using Quikrete 5000 as a more affordable option. I bought my chairs at World Market, and you can find similar chairs on their website by clicking here – http://bit.ly/1MXOKt7
Assemble Melamine Form
You should set that large, bottom piece of the melamine form on a flat, level work surface. With melamine forms, you’ll want to be sure to keep it very clean and make sure there are no imperfections or chipping in any of the boards. Whatever faces the inside of the form will translate onto the concrete top after it’s poured.
We’ll assemble the sides with 1 ½ wood screws. Be sure to pre drill all holes before adding the screws and make sure everything is square, level, and flush when you’re screwing it together. Don’t add wood glue to the sides of the melamine form, because we’ll need to easily deconstruct it later.
Pour Concrete into Form
After mixing up the tubs concrete and getting it to a consistency that is peanut-butter-like, then we’ll add it to the form. Wear gloves for this process, spread the concrete evenly in the form and fill it about ⅔ full. Once you’ve reached ⅔ and have spread all of the concrete out evenly, we’ll add the piece of rebar reinforcement to the form. Place it into place and keep adding more concrete to fill it to the top of the form.
Screed, Trowel, and Let Cure
Once you’ve filled the form with your concrete mixture, we’ll want to level and smooth it all out. Using a scrap 2×4 piece of wood will work fine for the level and screeding of the concrete. Scrape the board from one side of the form to the other in a back-and-forth motion, scraping excess concrete out of the form and working it into low spots. Then we can vibrate the concrete either with a mallet, reciprocating saw (without the blade in), or orbital sander. Spend some time vibrating the concrete. Then trowel it all with a clean trowel and cover the whole concrete top with a plastic cover to help it cure evenly. Let the concrete cure and dry for the manufacturers recommended time. Once it has hardened slightly, you can come through and do a hard trowel of the bottom. Refer to the video for more information about this technique.
Build the Base Legs
Once you’ve poured your concrete and it is taking the necessary time it needs to cure, then we’ll move onto building the wood base. The wood base is a modern, simple design and should not take that long to build. Refer to the cut list in the plans for help in deciphering which base pieces go where. Your base basically consists of two 4×4 constructed boxes on each end and three 4×4 support stretchers running between the top of the boxes. When putting the joints together with the torx screws, be sure to pre drill to avoid any splitting of the wood. Also, generously add wood glue to the joint to ensure security and strength…more at http://www.diypete.com/ConcreteDiningTable
—-
Looking for more DIY videos? Be sure to check out our channel and subscribe for updates! We post a weekly tutorial every Thursday.
Looking for woodworking, concrete working, and other DIY projects plans to follow? You can download plans for free at http://gumroad.com/DIYPETE
Facebook: http://facebook.com/DiyProjectsWithPete
Instagram: http://instagram.com/diypete
DIYPETE.com
1627 W Main Street Suite 182
Bozeman, Montana 59715